


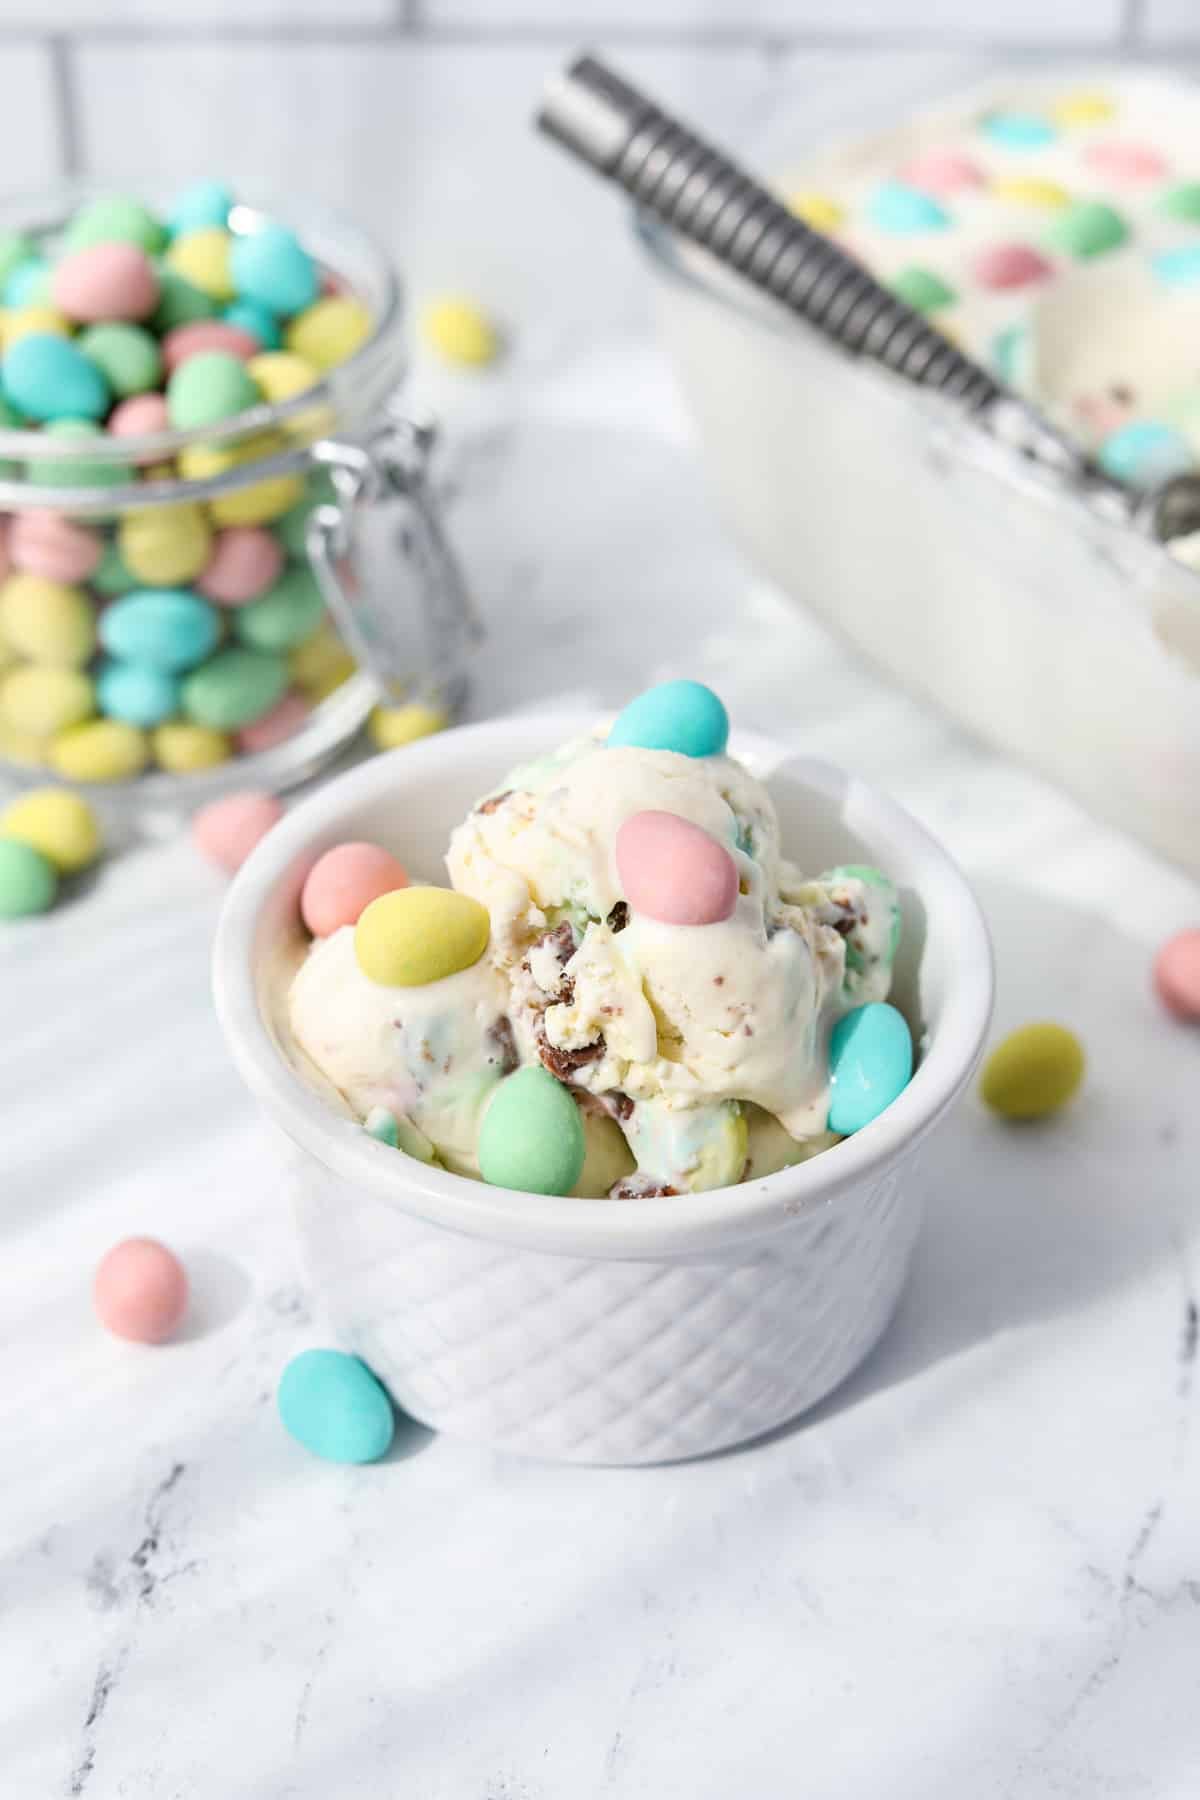
This easy 4 ingredient recipe for Mini Egg Ice Cream is decadent, delicious, and perfect for celebrating the Easter season! Soft peaks of homemade ice cream are speckled with crushed Mini Eggs, then scooped into bowls for all to enjoy.
Don't forget to try out another favorite: Lucky Charms Ice Cream. It's magically delicious!
Mini eggs have long been a favorite of mine, and I would eagerly await their arrival in stores sometime in the late Winter months. As soon as they were available I would buy a bag or two, and enjoy them two at a time. Of course, the pink ones were the best.
Over the years my sweet tooth has lessened, but I still have a soft spot for these milk chocolate-y Springtime treats. After recently sharing my recipe for Lucky Charms ice cream, I knew I had to share a version with mini eggs. I have to say, my family was absolutely thrilled!
And my husband? He told me it's the best ice cream he's ever had - and he's a huge Ben & Jerry's fan, so that really means something. I hope you enjoy this recipe as much as we have in my home.
Reasons to Love This Recipe:
- There is no ice cream maker needed! Since it's a no-churn recipe you'll just need an electric mixer to whip the cream - no special equipment is required.
- It's the perfect way to celebrate Spring and makes a delicious Easter-themed dessert.
- You need just 4 simple ingredients and the prep is less than 20 minutes!
- No raw eggs, egg whites, or egg yolks are needed, meaning it's perfect for those who avoid raw eggs or have an allergy.
- Cadbury Mini Eggs + ice cream = pure delight!
Ingredients
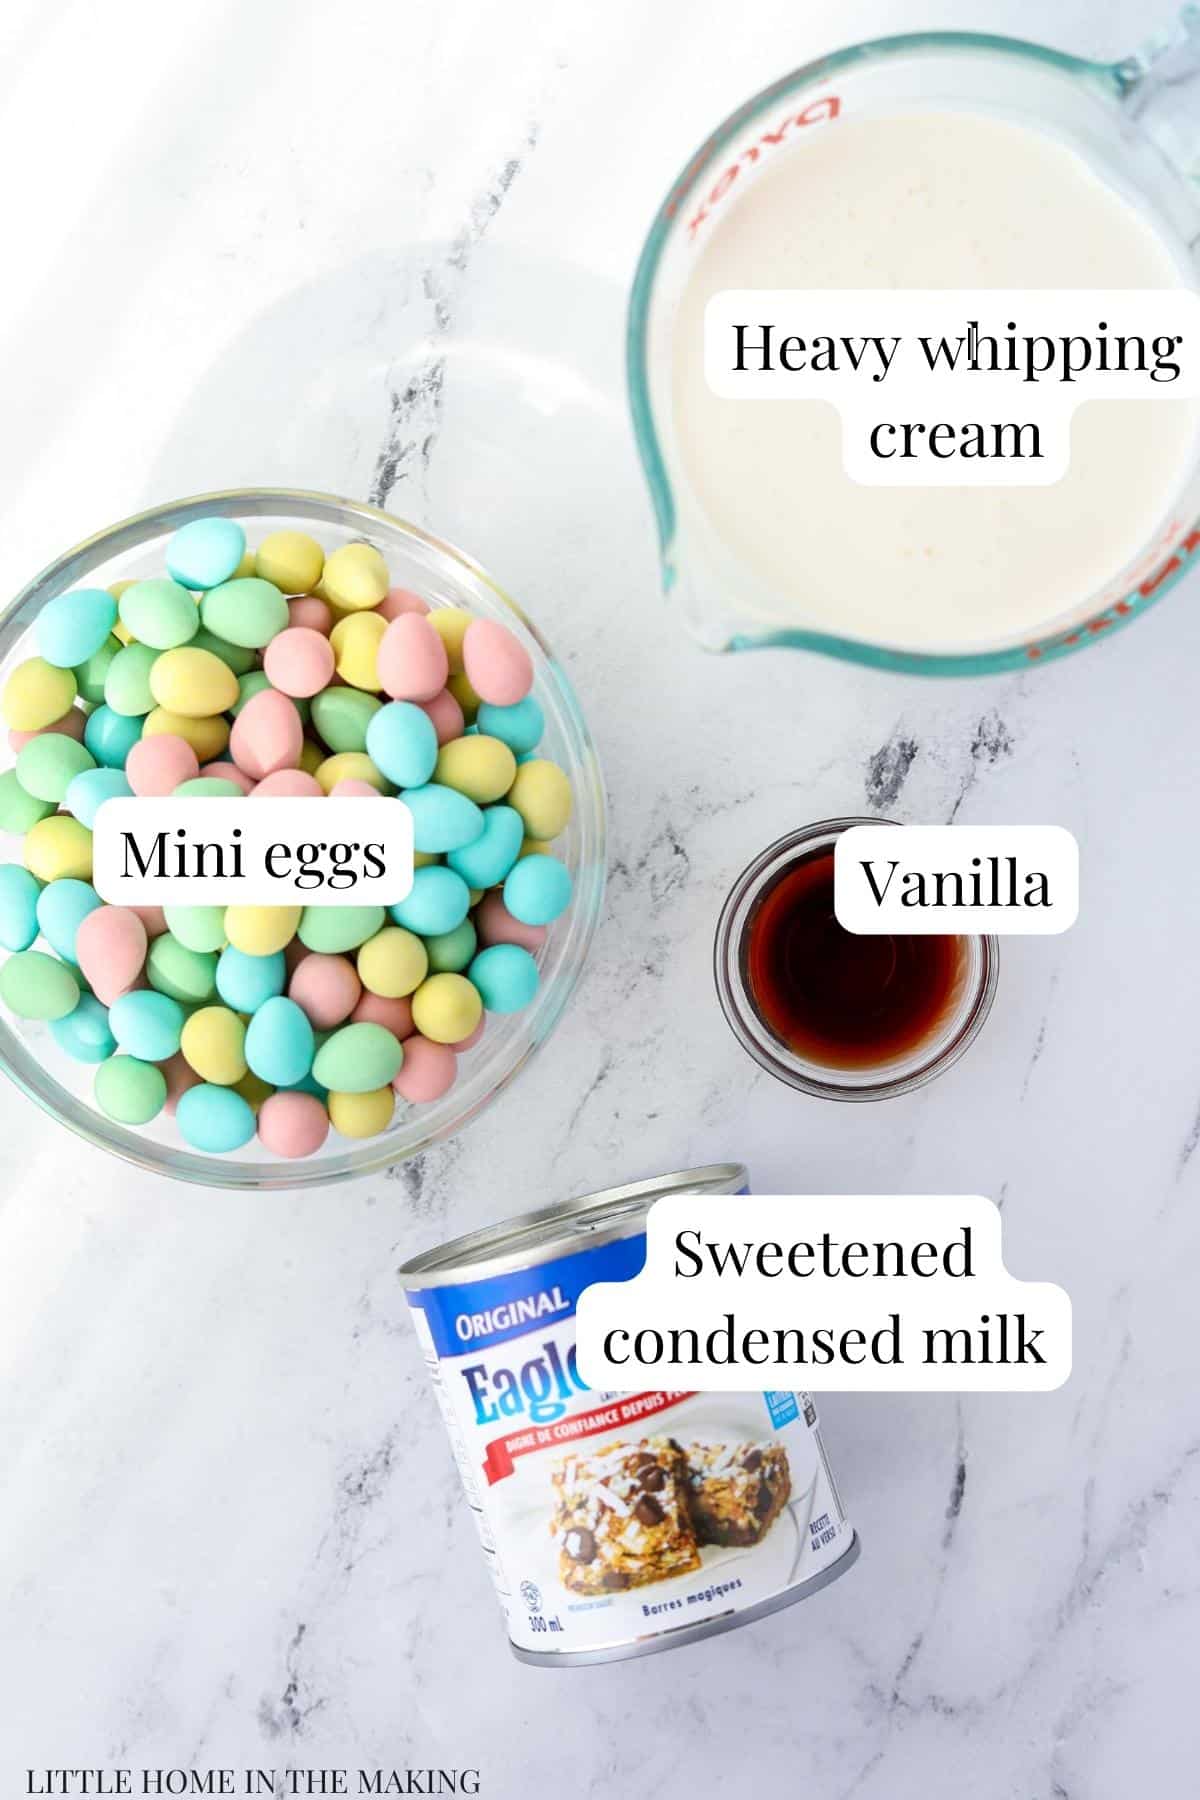
- Mini Eggs: You will need 1 ¾ cups of whole mini eggs, which is about 294 grams (or 10.5 ounces). I recommend using either a rolling pin or the back of a large knife to crush them into smaller pieces.
- Heavy cream: Also known as heavy whipping cream or double cream, this is the type of cream that is used for whipping. You'll need 2 cups, and it should be nice and chilled before using.
- Sweetened condensed milk: You will need 1 can, which is about 14 ounces (or 397 grams). This is the secret ingredient for no-churn ice cream!
- Vanilla extract: Just a touch creates a delicious vanilla ice cream base that provides a subtle (but yummy) backdrop.
Equipment & Tools:
- Electric mixer: This is for whipping heavy cream into stiff peaks. Although you can do it by hand, I recommend using either a stand mixer, electric hand mixer, or electric whisk to do the job.
- Loaf pan: You'll add your finished ice cream into this for freezing. Alternatively, you could use a special ice cream container, which allows for longer storage.
How to Make Mini Egg Ice Cream
Chilling the Loaf Pan
Before you get started I recommend pre-chilling the loaf pan (or storage container) that you will be using for freezing your ice cream base. This helps the ice cream freeze more quickly, which ensures that it will firm up during the chilling time.
I've experimented with chilled vs. unchilled loaf pans and those that did not chill for at least 20 minutes beforehand resulted in an overall softer ice cream that took longer to freeze.
The Vanilla Ice Cream Base
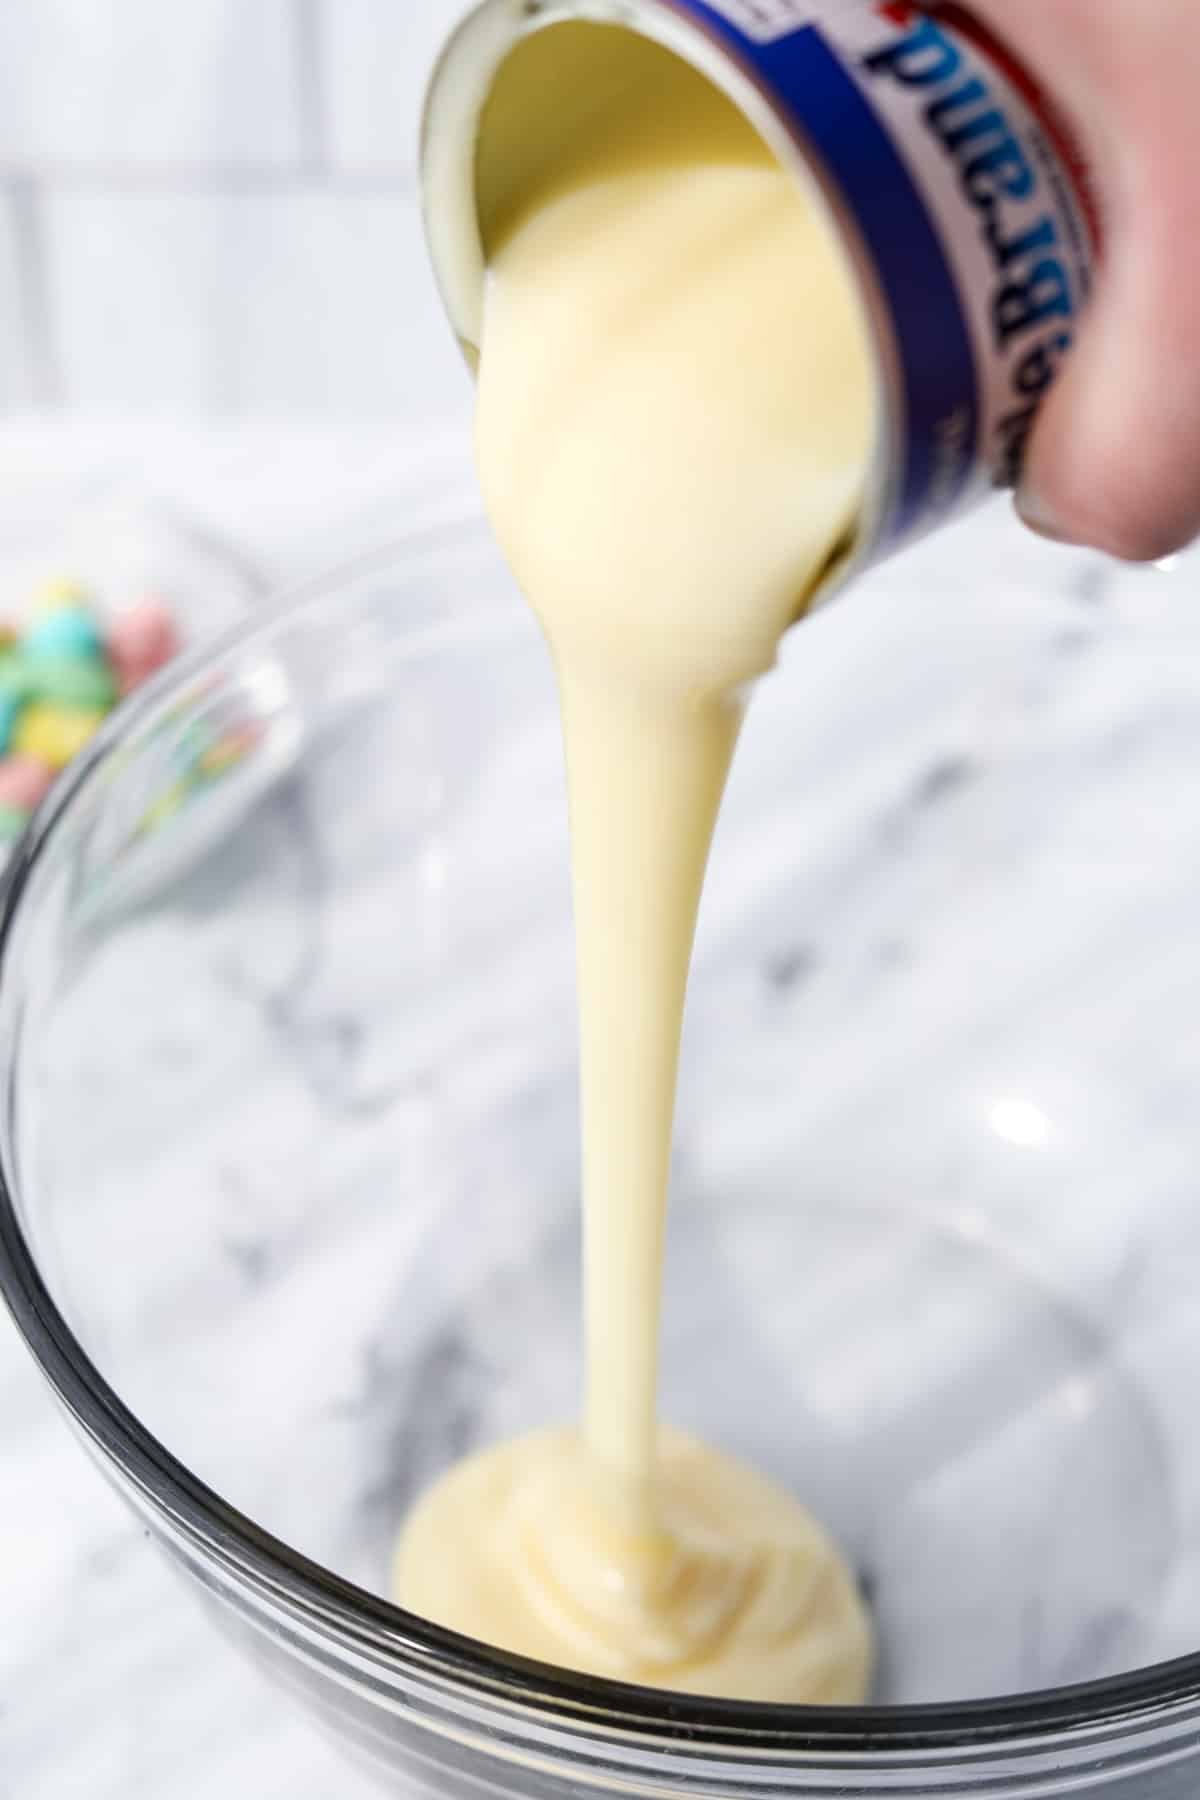
Step one: Add the full can of sweetened condensed milk to a large bowl, along with the vanilla extract. Mix well to combine and set aside.
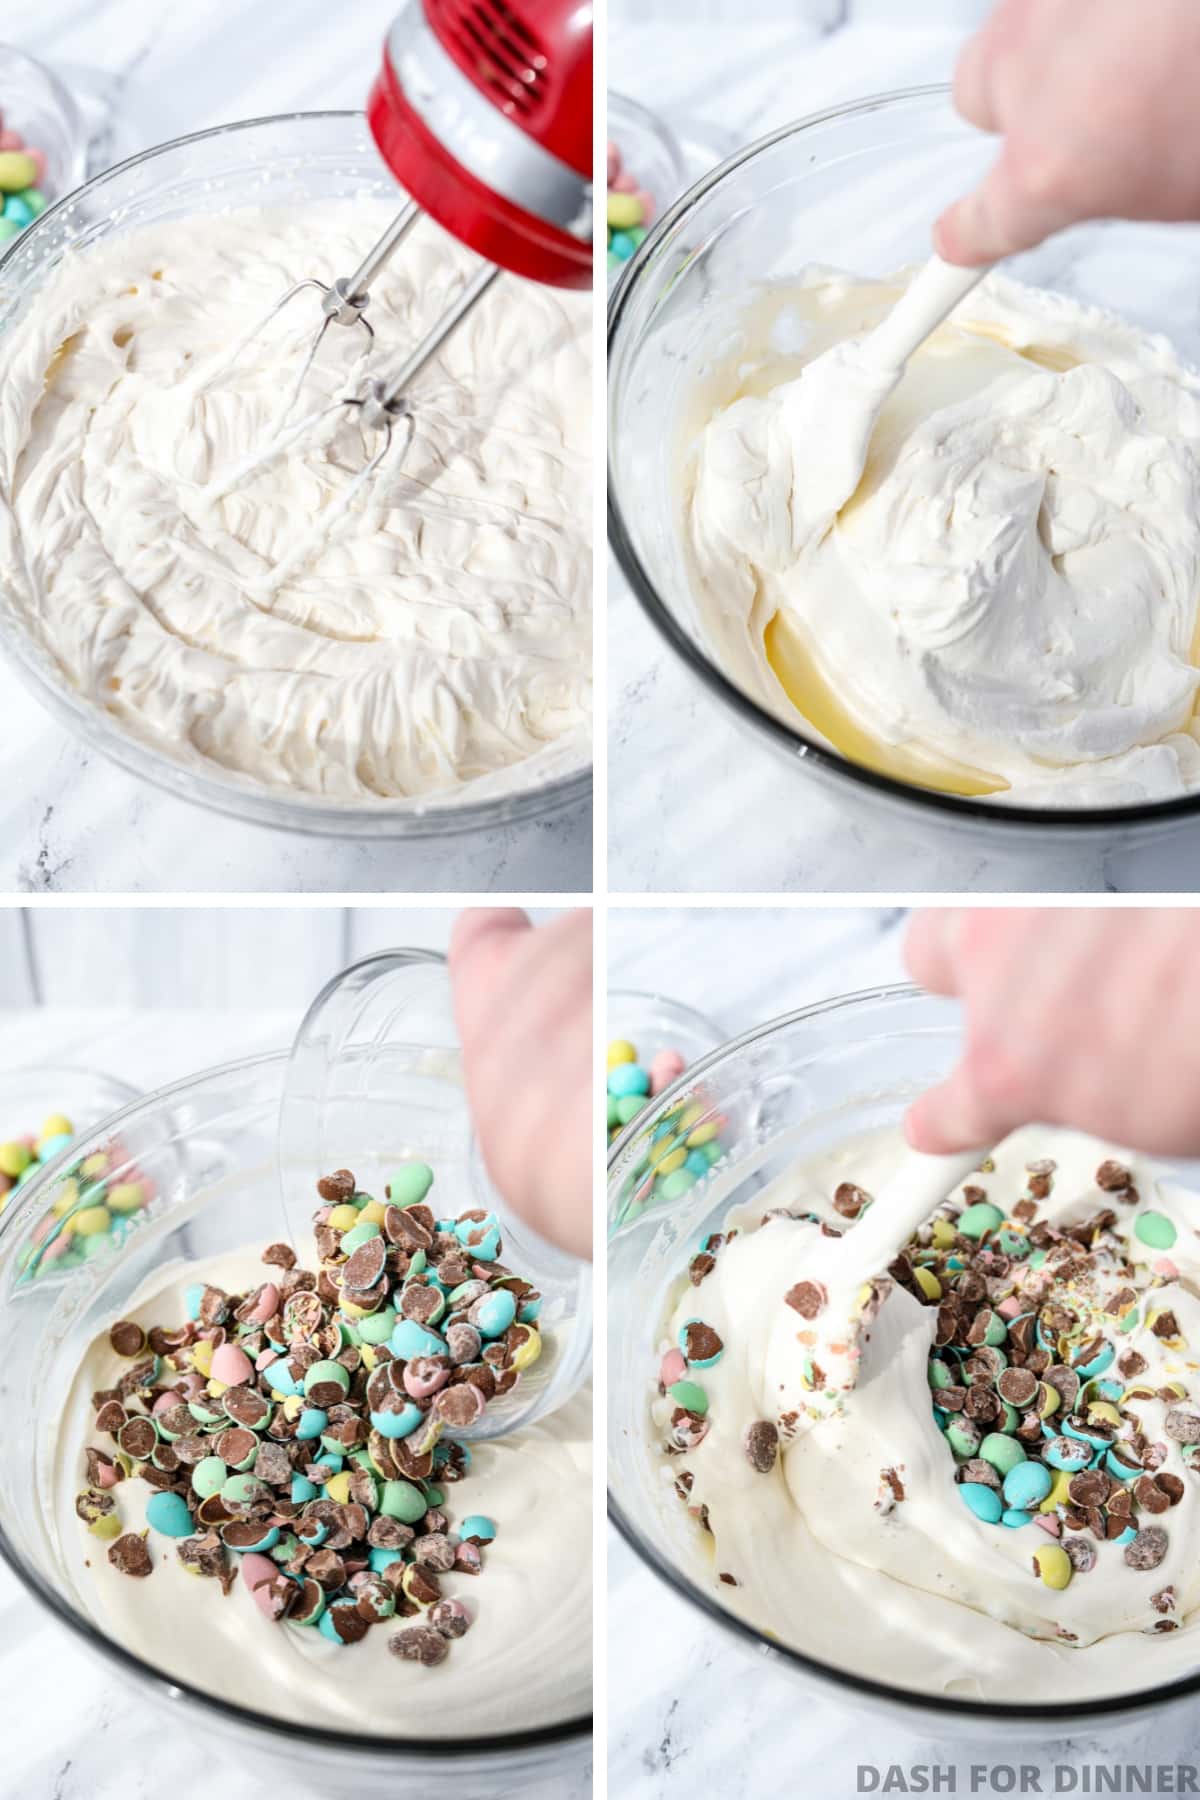
Step two: Pour the heavy whipping cream into a large clean bowl (chilled if possible) and use an electric hand mixer on high speed to beat it until stiff peaks form (4-5 minutes). A stand mixer fitted with the whisk attachment works even better for this step if available.
Step three: Add the whipped cream to the sweetened condensed milk mixture and fold it in gently with a silicone spatula until smooth and uniform.
Adding Crushed Mini Eggs
Step four: Add the crushed mini eggs to the ice cream base, reserving a few whole mini eggs for topping the ice cream (if desired). Fold them into the ice cream until evenly distributed.
To crush the Mini Eggs:
Place a small amount on a cutting board and use the side of a large knife or a heavy rolling pin to crush the eggs into smaller pieces.
Note: If preparing this dessert for small children (under 5 years) make sure to crush all of the eggs into small pieces and do not include any whole mini eggs. This is because the shape and size of mini eggs pose a similar choking hazard as grapes.
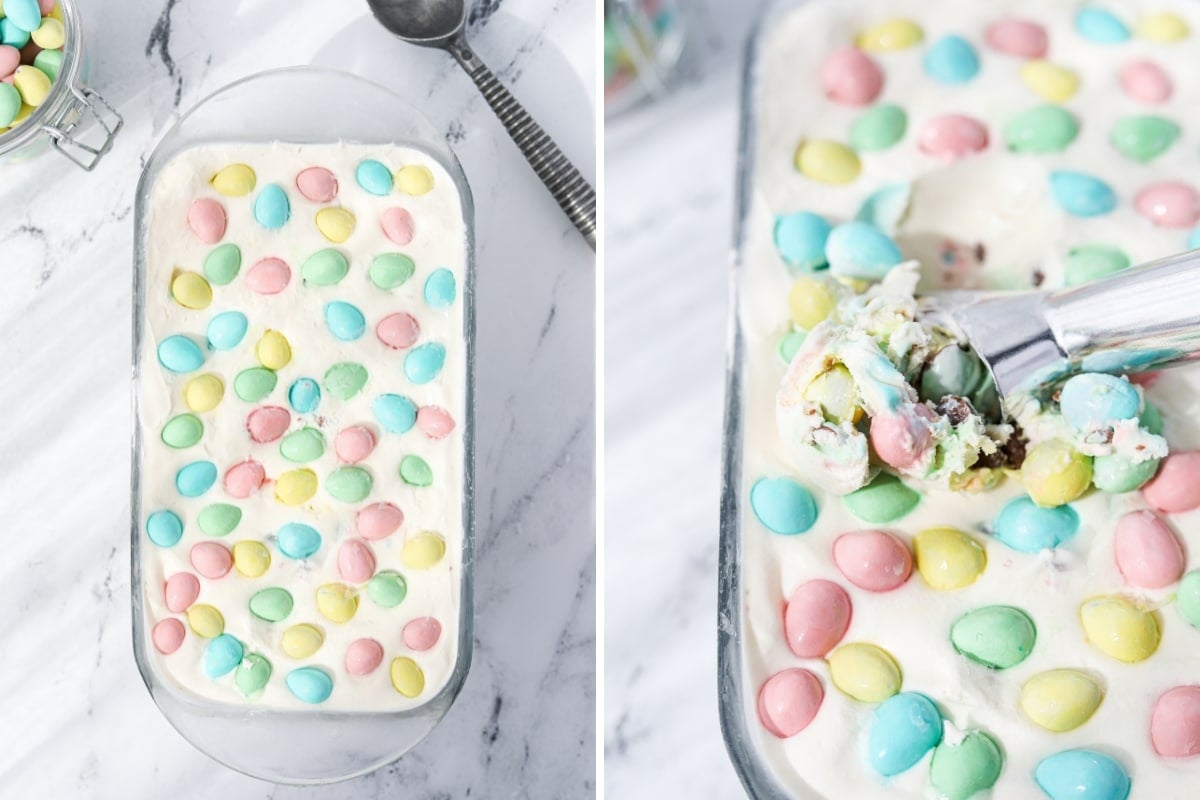
Step five: Add the ice cream mixture into the prepared and chilled loaf pan, smoothing it into an even layer.
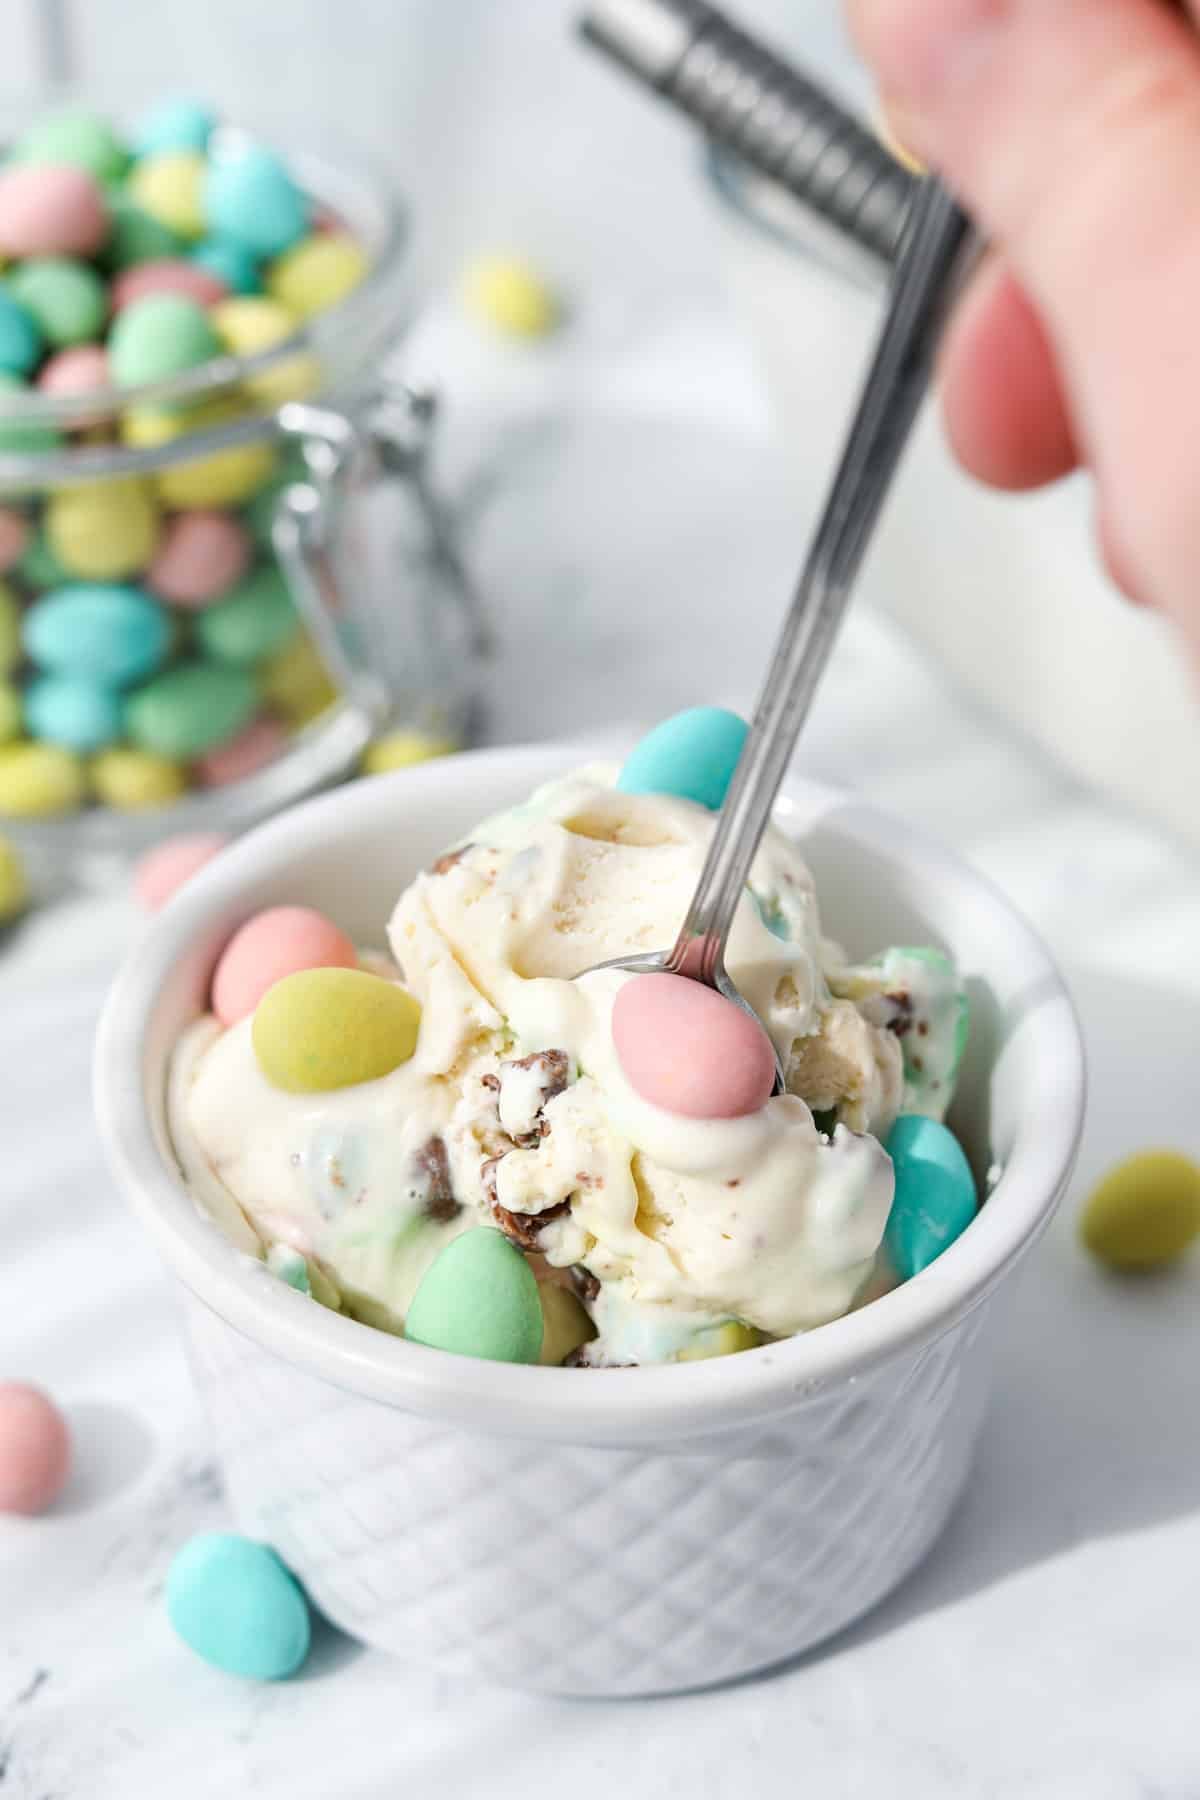
Step six: Top the ice cream with whole mini eggs, pressing them in gently. If you are making this for small children, be sure to either omit this step or use finely crushed mini eggs.
Freezing Homemade Mini Egg Ice Cream
Cover the loaf pan (or freezable container) with plastic wrap or aluminum foil and place it in a flat location in your freezer. In my experience, the small freezer for your fridge works better than a deep freezer, although your results may vary!
Freeze for at least 6 hours, although 12 hours is the sweet spot. You want the ice cream to be firm, yet scoopable.
Once it has frozen and is set in the middle you're ready to serve! Scoop into bowls and serve immediately, or save it for later.
Storing Homemade Ice Cream
Wrap any leftovers tightly in plastic wrap or aluminum foil and keep them in the freezer for up to 1-2 weeks.
If you want to store your ice cream for longer, or reduce the chances of freezer burn, transfer it to an airtight container and freeze it for up to 4 weeks. I recommend Tovolo ice cream containers for the best results.

Tips for Success
- Pre-Freeze the Loaf Pan: I highly recommend that you place the loaf pan in the freezer beforehand to chill for at least 20 minutes. This results in a firmer ice cream that sets up in less time. It's a simple step that makes a big difference!
- Chill the Bowls: Sometimes it can be hard to get heavy cream to whip up easily. If you think of it, I recommend placing the bowl you will be using in the freezer to chill for 20 minutes or so.
- Work Quickly: In order for the ice cream to freeze quickly (and prevent the mini eggs from falling through to the bottom) it's important to work quickly. Don't allow your whipped cream to rest at room temperature for too long while you crush the mini eggs. Instead, try crushing the mini eggs while the loaf pan chills so they are ready to go.
Variations
Cadbury Creme Egg Ice Cream: Substitute the mini eggs for Cadbury Creme Eggs, using the smaller ones if you can find them. Cut them in half just before adding them to the vanilla ice cream mixture.
Lighter: Use a light or low-fat can of sweetened condensed milk instead of the regular kind, and reduce the mini eggs to approximately 1 cup. Heavy whipping cream cannot be substituted because lighter creams will not whip.
Using an Ice Cream Machine: Although this recipe does not require an ice cream maker, you could use one if you prefer. Simply combine the heavy cream, condensed milk, and vanilla extract in a bowl. Transfer to the frozen bowl of your ice cream maker and churn for 20-35 minutes, or until whipped and thick. Add in the mini eggs and allow the machine to mix for an additional 1-4 minutes, or until they are worked into the ice cream. Transfer to a freezable container and freeze for at least 4 hours, or until firm.

Frequently Asked Questions
Cadbury Mini Eggs are available in the US during the Spring and Easter season, while they are available year-round in Canada and the UK. If you want to find Cadbury Mini Eggs during the off-season you may have luck on Amazon, or by checking a local specialty market that carries British and UK foods.
In both Canada and the UK you can purchase Mini Eggs all year round, although Cadbury Creme Eggs are only available during the Spring and Easter season.
While Cadbury Mini Eggs are not labeled as gluten-free, they are free of any gluten-containing ingredients. This means they are likely fine to consume for those who are gluten-free or even celiac, but they do run the risk of cross-contamination, although it is likely rare.
More Easy Dessert Recipes
- Lucky Charms Ice Cream
- Lazy Cheesecake Salad
- No Bake Chocolate Chip Cheesecake
- Cuppa Cuppa Cake
- Berry Cheesecake Salad

Mini Egg Ice Cream
Equipment
- Stand mixer or electric hand mixer
Ingredients
- 2 cups heavy whipping cream chilled
- 14 ounces sweetened condensed milk
- 1 ½ teaspoons vanilla extract
- 1 ¾ cup Cadbury Mini Eggs 294 grams
Instructions
- Line a 9X5 loaf pan with parchment paper and place it in the freezer to chill while you prepare the ice cream base.
- Add the sweetened condensed milk and vanilla extract to a large bowl and stir to combine. Set aside.
- Place the mini eggs on a cutting board and use the side of a large knife or a bench scraper to gently crush the mini eggs. Keep ¼-½ cup whole for topping the ice cream, if desired.
- Add the heavy cream to the bowl of a stand mixer fitted with the whisk attachment (or use a large bowl and an electric hand mixer).
- Mix the heavy cream on medium-high speed until stiff peaks form.
- Add the whipped cream to the bowl of sweetened condensed milk and vanilla, and gently fold them together.
- Pour in the crushed mini eggs and fold them into the whipped cream and condensed milk mixture until well combined.
- Transfer the ice cream base to the chilled loaf pan, spreading it out into an even layer.
- Top the ice cream with the remaining whole mini eggs (if desired) and cover it with a layer of plastic wrap or aluminum foil.
- Place the loaf pan in the freezer and chill for at least 6 hours, or 12+ hours for the best results.
- Serve and enjoy! Store any leftovers in the freezer for up to 2 weeks.
Notes
Nutrition
Please note that some of my blog posts here at Dash for Dinner may contain affiliate links. If you make a purchase through these links, I will get a small commission at no additional cost to you. Please see my Disclaimer for more information.

Steven H. says
We made this ice cream and it was such a hit! We always get excited around here when its Cadbury egg season. Our 6 year old especially loves them and tends to hold them in his hands too long and the color melts hands and then all over our carpets... So while we love the easter season, it also becomes carpet cleaning season, haha. Long story short, loved this ice cream!!